# Présentation

Pilotage, supervision, redémarrage à distance

# Description fonctionnelle

> <span style="font-size: 9.0pt; mso-bidi-font-size: 11.0pt; font-family: 'Arial',sans-serif; mso-fareast-font-family: 'Times New Roman'; color: black; mso-fareast-language: FR;"><span style="color: rgb(35, 111, 161);">**Modlink est un IoT professionnel interactif et autonome entièrement configurable et sans serveur central (cloud)**</span>  
> </span>

<span style="color: rgb(68, 68, 68);">ModLink 2PIO est une **solution d’automatisation connectée** compacte avec serveur Web intégré.  
L'accès aux fonctions de configuration, de supervision et de commande se fait depuis un simple navigateur Internet sans nécessiter d'application dédiée ni de matériel supplémentaire.  
Dispositif **polyvalent**, ModLink peut fonctionner de manière **autonome** ou au sein d'un **réseau interactif** de modules.</span>

<p class="callout success">ModLink représente une alternative simple et économique aux automates programmables industriels (API / PLC) pour des applications "light" d'automatisation, de supervision et d'efficience énergétique.</p>

### 1- Programmation

<span style="color: rgb(68, 68, 68);">ModLink utilise une approche graphique basée sur des **scénarios**, sans programmation de type "automate programmable".  
</span><span style="color: rgb(68, 68, 68);">Les automatismes sont créés en assemblant des **blocs fonctionnels** représentant des *tests*, des *conditions*, des *actions*, des *temporisations* ou encore des *notifications*. Cette méthode simplifie la conception, la maintenance et l'évolution des applications tout en conservant une grande souplesse de fonctionnement.</span>

<span style="color: rgb(68, 68, 68);">Les scénarios s'exécutent **en boucle de manière continue** afin d'analyser les événements, les entrées, les sorties et les variables du système.   
Ils utilisent des **variables internes ou externes, partagées** entre plusieurs scénarios et même entre plusieurs modules.</span>

<span style="color: rgb(68, 68, 68);">Chaque ModLink peut gérer jusqu'à **3 scénarios indépendants**, exécutés de façon autonome et pouvant être activés ou désactivés individuellement selon les besoins de l'application.</span>

<p class="callout success">Tel un agent de sécurité qui effectue des rondes, le scénario surveille en permanence différents points de contrôle dans un ordre défini :  
- les entrées (voyants, ouvrants, environnement ...)  
- les sorties (interrupteur, vanne, alerte ...)  
- les variables (rapports des agents précédents)  
Une fois l’ensemble des vérifications effectué, le cycle se répète en permanence</p>

### 2- Fonctionnement autonome

<span style="color: rgb(68, 68, 68);">Grâce à son serveur Web intégré, ModLink est accessible en **local ou à distance** depuis n'importe quel ordinateur, tablette ou Smartphone équipé d'un navigateur Internet. Aucun logiciel spécifique n'est nécessaire pour accéder à la configuration ou à la programmation du module.</span>

<span style="color: rgb(68, 68, 68);">ModLink fonctionne **sans abonnement ni serveur central (cloud)**. Les échanges avec les autres équipements s'effectuent directement entre appareils, sans intermédiaire, ce qui réduit les dépendances externes et améliore la fiabilité ainsi que la robustesse du système.</span>  
<span style="color: rgb(68, 68, 68);">Cette architecture garantit la continuité de fonctionnement des automatismes, même en cas d'indisponibilité d'un service distant ou d'une connexion Internet.</span>

<p class="callout info">Chaque module peut exécuter sa logique **localement** et **interagir** de manière transparente avec d’autres modules du même réseau</p>

### **<span style="font-size: 10.0pt; mso-bidi-font-size: 11.0pt; line-height: 115%; mso-ascii-font-family: Calibri; mso-fareast-font-family: Calibri; mso-hansi-font-family: Calibri; mso-bidi-font-family: Calibri;"><span style="color: rgb(34, 34, 34); font-family: 'Noto Sans', sans-serif; font-size: 2.333em; font-weight: 400;">3- Communication</span></span>**

ModLink dispose de fonctions de communication avancées facilitant son intégration dans les infrastructures existantes et l'accès à distance.

La communication réseau repose sur les **protocoles TCP/IP via Wi-Fi**. L'intégration au réseau est simplifiée grâce au **DHCP** pour l'attribution automatique des adresses IP et au **mDNS** permettant la découverte automatique des équipements.

Pour l'accès distant, ModLink intègre un **tunnel SSH sécurisé** permettant d'accéder au module sans configuration complexe du réseau ni redirection de ports sur le routeur.

Le serveur **OPC UA** intégré assure une compatibilité native avec les systèmes de GTB/GTC, les plateformes **SCADA** et les logiciels de supervision industrielle, facilitant l'échange de données et l'interopérabilité avec les équipements du marché.

# Description du boîtier

### 1- Etat des voyants

Le dispositif comporte **6 voyants LED** permettant de visualiser l’état du système, des communications et des entrées/sorties.

[![2pio3.jpeg](https://modlink.fr/help/uploads/images/gallery/2026-02/scaled-1680-/2pio3.jpeg)](https://modlink.fr/help/uploads/images/gallery/2026-02/2pio3.jpeg)
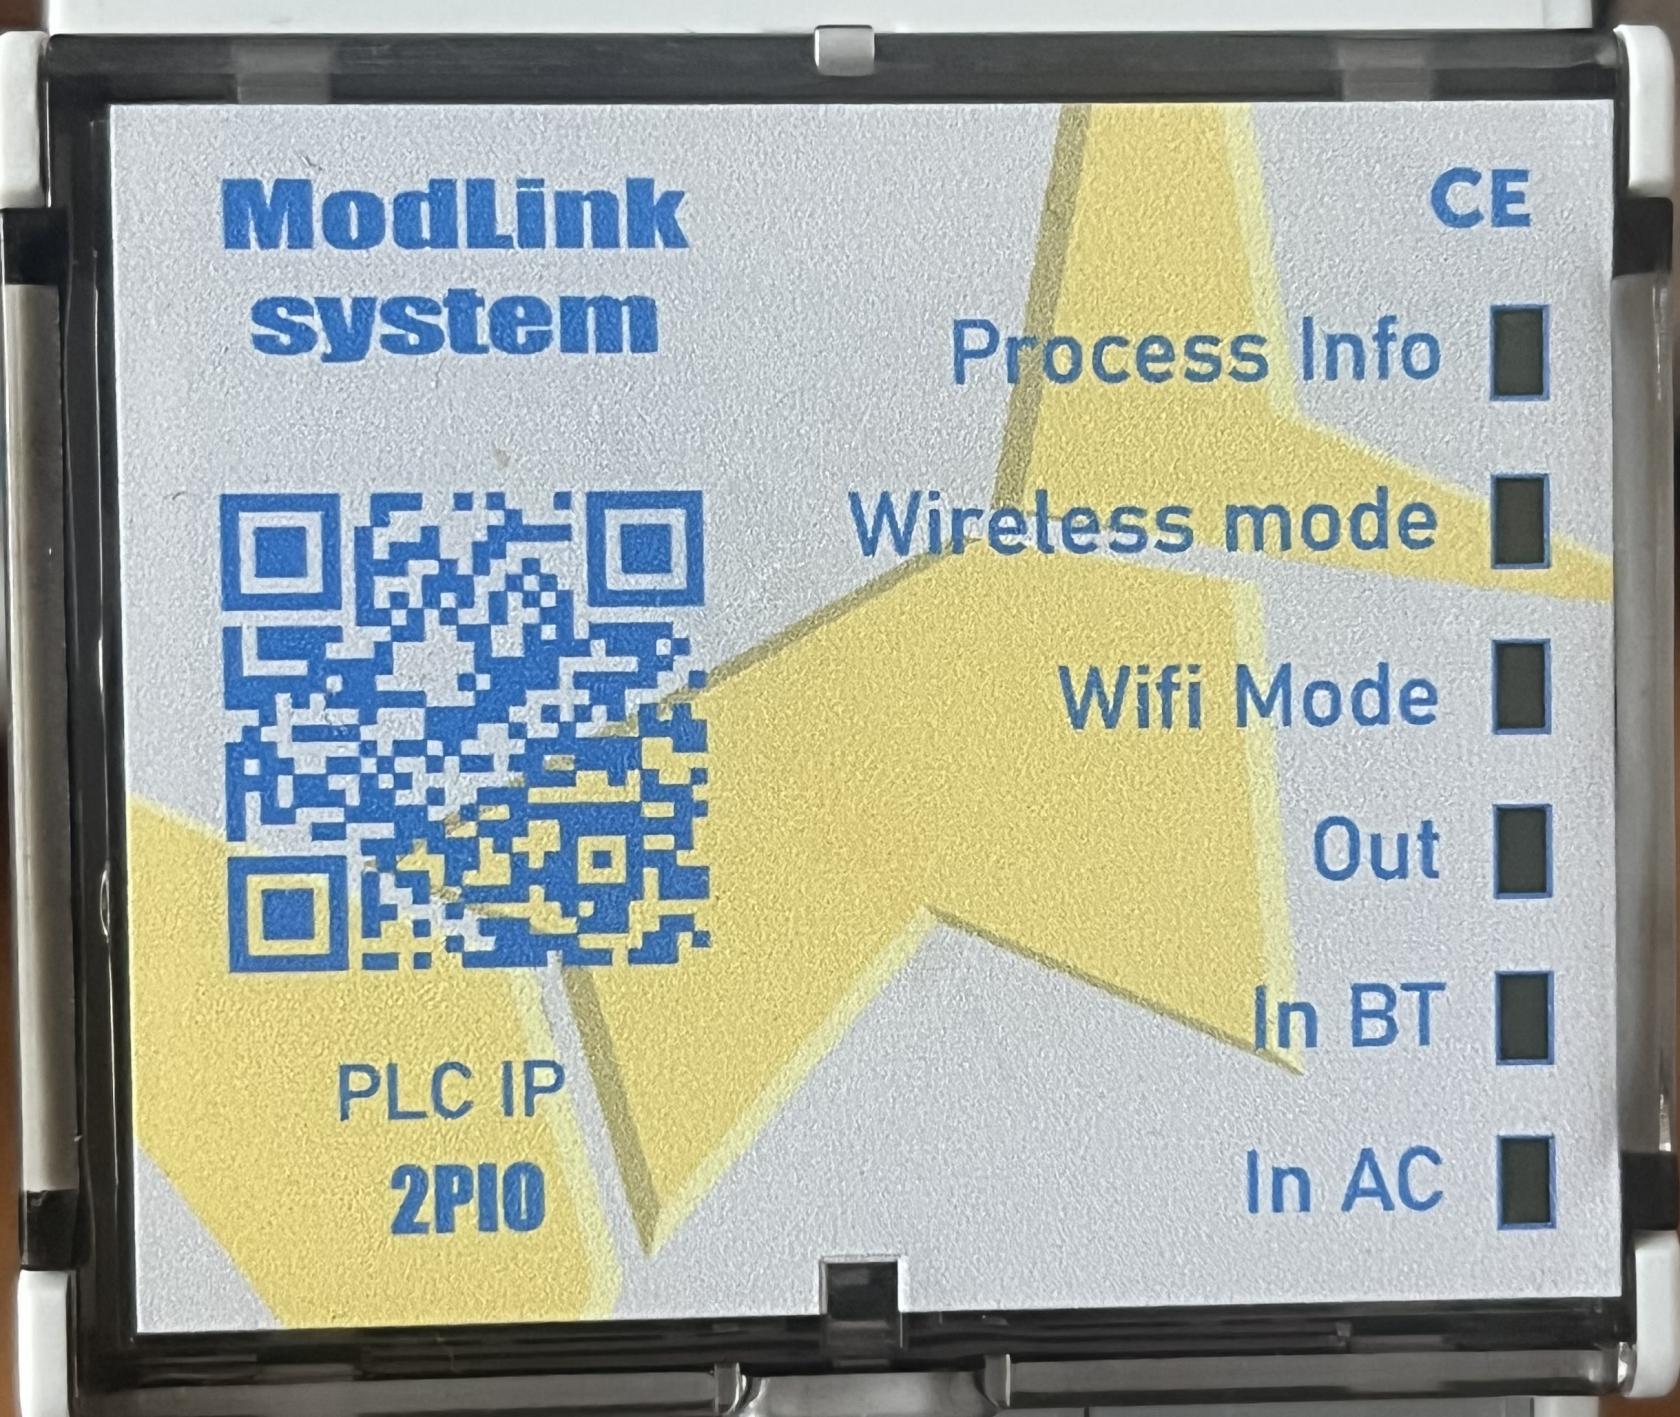
#### 1.1- <span style="color: rgb(0, 0, 0);">Voyant "Process information" - S</span><span style="color: rgb(0, 0, 0);">cénario </span>

<div class="TyagGW_tableContainer" id="bkmrk-%C3%89tat-du-voyant-signi"><div class="group TyagGW_tableWrapper flex flex-col-reverse w-fit" tabindex="-1"><table border="1" class="w-fit min-w-(--thread-content-width)" data-end="768" data-start="445" style="width: 109.048%; height: 122.4px; border-collapse: collapse; border-color: rgb(0, 0, 0);"><thead data-end="500" data-start="445"><tr data-end="500" data-start="445" style="height: 29.6px; background-color: rgb(206, 212, 217);"><th class="align-center" data-col-size="sm" data-end="462" data-start="445" style="width: 26.95%; height: 29.6px; border-color: rgb(0, 0, 0);">**<span style="color: rgb(0, 0, 0);">État du voyant</span>**</th><th class="align-center" data-col-size="sm" data-end="478" data-start="462" style="width: 28.3539%; height: 29.6px; border-color: rgb(0, 0, 0);">**<span style="color: rgb(0, 0, 0);">Signification</span>**</th><th data-col-size="md" data-end="500" data-start="478" style="width: 44.6961%; height: 29.6px; border-color: rgb(0, 0, 0);">**<span style="color: rgb(0, 0, 0);">Action recommandée</span>**</th></tr></thead><tbody data-end="768" data-start="555"><tr data-end="651" data-start="555" style="height: 33.6px;"><td data-col-size="sm" data-end="577" data-start="555" style="width: 26.95%; height: 33.6px; background-color: rgb(45, 194, 107); border-color: rgb(0, 0, 0);"><span style="color: rgb(0, 0, 0);">vert</span>**<span style="color: rgb(0, 0, 0);"> clignotant</span>**</td><td data-col-size="sm" data-end="612" data-start="577" style="width: 28.3539%; height: 33.6px; border-color: rgb(0, 0, 0);"><span style="color: rgb(0, 0, 0);">Démarrage</span></td><td data-col-size="md" data-end="651" data-start="612" style="width: 44.6961%; height: 33.6px; border-color: rgb(0, 0, 0);"><span style="color: rgb(0, 0, 0);">Attendre la fin de l’initialisation</span></td></tr><tr><td style="width: 26.95%; background-color: rgb(45, 194, 107); border-color: rgb(0, 0, 0);"><span style="color: rgb(0, 0, 0);">vert **fixe**</span></td><td style="width: 28.3539%; border-color: rgb(0, 0, 0);"><span style="color: rgb(0, 0, 0);">Fonctionnement normal</span></td><td style="width: 44.6961%; border-color: rgb(0, 0, 0);"><span style="color: rgb(0, 0, 0);">  
</span></td></tr><tr style="height: 29.6px;"><td style="width: 26.95%; height: 29.6px; background-color: rgb(224, 62, 45); border-color: rgb(0, 0, 0);"><span style="color: rgb(0, 0, 0);">rouge **clignotant**</span></td><td style="width: 28.3539%; height: 29.6px; border-color: rgb(0, 0, 0);"><span style="color: rgb(0, 0, 0);">Erreur survenue</span></td><td style="width: 44.6961%; height: 29.6px; border-color: rgb(0, 0, 0);"><span style="color: rgb(0, 0, 0);">Réinitialiser le voyant depuis le menu "Paramètres"</span></td></tr></tbody></table>

</div></div>#### <span style="color: rgb(0, 0, 0);">1.2- Voyant "Wireless mode" - T</span><span style="color: rgb(0, 0, 0);">ransmissions vers les autres modules </span>


<table border="1" class="w-fit min-w-(--thread-content-width)" data-end="768" data-start="445" id="bkmrk-%C3%89tat-du-voyant-signi-1" style="width: 99.881%; height: 118.892px; border-collapse: collapse; border-color: rgb(0, 0, 0);"><thead><tr data-end="500" data-start="445" style="height: 29.7869px; background-color: rgb(206, 212, 217);"><td class="align-center" data-col-size="sm" data-end="462" data-start="445" style="width: 38.0597%; height: 29.7869px; border-color: rgb(0, 0, 0);">**<span style="color: rgb(0, 0, 0);">État du voyant</span>**</td><td class="align-center" data-col-size="sm" data-end="478" data-start="462" style="width: 61.9403%; height: 29.7869px; border-color: rgb(0, 0, 0);">**<span style="color: rgb(0, 0, 0);">Signification</span>**</td></tr></thead><tbody data-end="768" data-start="555"><tr style="height: 29.7017px;"><td style="width: 38.0597%; background-color: rgb(53, 152, 219); border-color: rgb(0, 0, 0); height: 29.7017px;"><span style="color: rgb(0, 0, 0);">bleu **fixe**</span></td><td style="width: 61.9403%; border-color: rgb(0, 0, 0); height: 29.7017px;"><span style="color: rgb(0, 0, 0);">Transmissions activées </span></td></tr><tr style="height: 29.7017px;"><td style="width: 38.0597%; background-color: rgb(53, 152, 219); border-color: rgb(0, 0, 0); height: 29.7017px;"><span style="color: rgb(0, 0, 0);">bleu **clignotant**</span></td><td style="width: 61.9403%; border-color: rgb(0, 0, 0); height: 29.7017px;"><span style="color: rgb(0, 0, 0);">mode "appairage"</span></td></tr><tr style="height: 29.7017px;"><td style="width: 38.0597%; background-color: rgb(224, 62, 45); border-color: rgb(0, 0, 0); height: 29.7017px;"><span style="color: rgb(0, 0, 0);">rouge **fixe**</span></td><td style="width: 61.9403%; border-color: rgb(0, 0, 0); height: 29.7017px;"><span style="color: rgb(0, 0, 0);">Transmissions désactivées</span></td></tr></tbody></table>

#### <span style="color: rgb(0, 0, 0);">1.3- Voyant "Wi-Fi mode" - Connectivité</span>  


<table border="1" id="bkmrk-%C3%89tat-du-voyant-signi-2" style="border-collapse: collapse; width: 100%; height: 148.736px; border-width: 1px; border-color: rgb(0, 0, 0);"><colgroup><col style="width: 37.779%;"></col><col style="width: 62.2102%;"></col></colgroup><thead><tr style="background-color: rgb(206, 212, 217); height: 29.7585px;"><td class="align-center" data-col-size="sm" data-end="462" data-start="445" style="width: 18.5234%; height: 29.7585px; border-color: rgb(0, 0, 0);">**<span style="color: rgb(0, 0, 0);">État du voyant</span>**</td><td class="align-center" data-col-size="sm" data-end="478" data-start="462" style="width: 45.98%; height: 29.7585px; border-color: rgb(0, 0, 0);">**<span style="color: rgb(0, 0, 0);">Signification</span>**</td></tr></thead><tbody><tr style="height: 29.7585px;"><td style="height: 29.7585px; background-color: rgb(45, 194, 107); border-color: rgb(0, 0, 0);"><span style="color: rgb(0, 0, 0);">vert **fixe**</span></td><td style="height: 29.7585px; border-color: rgb(0, 0, 0);"><span style="color: rgb(0, 0, 0);">Connexion Wi-Fi active</span></td></tr><tr style="height: 29.7585px;"><td style="height: 29.7585px; background-color: rgb(45, 194, 107); border-color: rgb(0, 0, 0);"><span style="color: rgb(0, 0, 0);">vert **clignotant**</span></td><td style="height: 29.7585px; border-color: rgb(0, 0, 0);"><span style="color: rgb(0, 0, 0);">mode AP - routeur </span></td></tr><tr style="height: 29.7585px;"><td style="height: 29.7585px; background-color: rgb(185, 106, 217); border-color: rgb(0, 0, 0);"><span style="color: rgb(0, 0, 0);">violet **fixe**</span></td><td style="height: 29.7585px; border-color: rgb(0, 0, 0);"><span style="color: rgb(0, 0, 0);">Tunnel SSH actif</span></td></tr><tr style="height: 29.7017px;"><td style="height: 29.7017px; border-color: rgb(0, 0, 0); background-color: rgb(230, 126, 35);"><span style="color: rgb(0, 0, 0);">orange **clignotant**</span>

</td><td style="height: 29.7017px; border-color: rgb(0, 0, 0);"><span style="color: rgb(0, 0, 0);">Tunnel SSH inactif</span></td></tr><tr><td style="border-color: rgb(0, 0, 0); background-color: rgb(224, 62, 45);"><span style="color: rgb(0, 0, 0);">rouge **fixe**</span>

</td><td style="border-color: rgb(0, 0, 0);"><span style="color: rgb(0, 0, 0);">absence de connexion Wi-Fi</span></td></tr></tbody></table>

#### <span style="color: rgb(0, 0, 0);">1.4- Voyant "Out" - Relais</span>

<table border="1" id="bkmrk-%C3%89tat-du-voyant-signi-3" style="border-collapse: collapse; width: 100%; height: 148.508px; border-width: 1px; border-color: rgb(0, 0, 0);"><colgroup><col style="width: 37.1824%;"></col><col style="width: 62.8176%;"></col></colgroup><thead><tr style="height: 29.7017px; background-color: rgb(206, 212, 217);"><td class="align-center" data-col-size="sm" data-end="462" data-start="445" style="width: 18.5234%; height: 29.7017px; border-color: rgb(0, 0, 0);">**<span style="color: rgb(0, 0, 0);">État du voyant</span>**</td><td class="align-center" data-col-size="sm" data-end="478" data-start="462" style="width: 45.98%; height: 29.7017px; border-color: rgb(0, 0, 0);">**<span style="color: rgb(0, 0, 0);">Signification</span>**</td></tr></thead><tbody><tr style="height: 29.7017px;"><td style="border-color: rgb(0, 0, 0); height: 29.7017px;">**<span style="color: rgb(0, 0, 0);">Eteint</span>**</td><td style="border-color: rgb(0, 0, 0); height: 29.7017px;"><span style="color: rgb(0, 0, 0);">contacts 1 et 2 ouverts</span></td></tr><tr style="height: 29.7017px;"><td style="border-color: rgb(0, 0, 0); background-color: rgb(224, 62, 45); height: 29.7017px;"><span style="color: rgb(0, 0, 0);">rouge **fixe**</span></td><td style="border-color: rgb(0, 0, 0); height: 29.7017px;"><span style="color: rgb(0, 0, 0);">contact 1 fermé / contact 2 ouvert</span></td></tr><tr style="height: 29.7017px;"><td style="border-color: rgb(0, 0, 0); background-color: rgb(53, 152, 219); height: 29.7017px;"><span style="color: rgb(0, 0, 0);">bleu **fixe**</span></td><td style="border-color: rgb(0, 0, 0); height: 29.7017px;"><span style="color: rgb(0, 0, 0);">contact 2 fermé / contact 1 ouvert</span>

</td></tr><tr style="height: 29.7017px;"><td style="height: 29.7017px; border-color: rgb(0, 0, 0); background-color: rgb(185, 106, 217);"><span style="color: rgb(0, 0, 0);">violet **fixe**</span></td><td style="height: 29.7017px; border-color: rgb(0, 0, 0);"><span style="color: rgb(0, 0, 0);">contacts 1 et 2 fermés</span></td></tr></tbody></table>

#### <span style="color: rgb(0, 0, 0);">1.5- Voyant "IN BT" - En</span><span style="color: rgb(0, 0, 0);">trées basse tension 24V </span>

<table border="1" id="bkmrk-%C3%89tat-du-voyant-signi-4" style="border-collapse: collapse; width: 100%; height: 148.508px; border-width: 1px; border-color: rgb(0, 0, 0);"><colgroup><col style="width: 37.183%;"></col><col style="width: 62.817%;"></col></colgroup><thead><tr style="height: 29.7017px; background-color: rgb(206, 212, 217);"><td class="align-center" data-col-size="sm" data-end="462" data-start="445" style="width: 18.5234%; height: 29.7017px; border-color: rgb(0, 0, 0);">**<span style="color: rgb(0, 0, 0);">État du voyant</span>**</td><td class="align-center" data-col-size="sm" data-end="478" data-start="462" style="width: 45.98%; height: 29.7017px; border-color: rgb(0, 0, 0);">**<span style="color: rgb(0, 0, 0);">Signification</span>**</td></tr></thead><tbody><tr style="height: 29.7017px;"><td style="height: 29.7017px; border-color: rgb(0, 0, 0);"><span style="color: rgb(0, 0, 0);">**Eteint**</span>

</td><td style="height: 29.7017px; border-color: rgb(0, 0, 0);"><span style="color: rgb(0, 0, 0);">entrée 1 et 2 ouvertes</span></td></tr><tr style="height: 29.7017px;"><td style="height: 29.7017px; background-color: rgb(224, 62, 45); border-color: rgb(0, 0, 0);"><span style="color: rgb(0, 0, 0);">rouge **fixe**</span>

</td><td style="height: 29.7017px; border-color: rgb(0, 0, 0);"><span style="color: rgb(0, 0, 0);">entrée 1 fermée / entrée 2 ouverte</span></td></tr><tr style="height: 29.7017px;"><td style="background-color: rgb(53, 152, 219); border-color: rgb(0, 0, 0); height: 29.7017px;"><span style="color: rgb(0, 0, 0);">bleu **fixe**</span>

</td><td style="border-color: rgb(0, 0, 0); height: 29.7017px;"><span style="color: rgb(0, 0, 0);">entrée 2 fermée / entrée 1 ouverte</span></td></tr><tr style="height: 29.7017px;"><td style="background-color: rgb(185, 106, 217); border-color: rgb(0, 0, 0); height: 29.7017px;"><span style="color: rgb(0, 0, 0);">Violet **fixe**</span>

</td><td style="border-color: rgb(0, 0, 0); height: 29.7017px;"><span style="color: rgb(0, 0, 0);">entrée 1 et 2 fermées</span></td></tr></tbody></table>

#### <span style="color: rgb(0, 0, 0);">1.6- Voyant "IN AC" - E</span><span style="color: rgb(0, 0, 0);">ntrées 220 V</span>

<table border="1" id="bkmrk-%C3%89tat-du-voyant-signi-5" style="border-collapse: collapse; width: 100%; height: 119.188px; border-width: 1px; border-color: rgb(0, 0, 0);"><colgroup><col style="width: 37.5409%;"></col><col style="width: 62.4591%;"></col></colgroup><thead><tr style="background-color: rgb(206, 212, 217); height: 29.7969px;"><td class="align-center" data-col-size="sm" data-end="462" data-start="445" style="width: 18.5234%; height: 29.7969px; border-color: rgb(0, 0, 0);">**<span style="color: rgb(0, 0, 0);">État du voyant</span>**</td><td class="align-center" data-col-size="sm" data-end="478" data-start="462" style="width: 45.98%; height: 29.7969px; border-color: rgb(0, 0, 0);">**<span style="color: rgb(0, 0, 0);">Signification</span>**</td></tr></thead><tbody><tr><td style="border-color: rgb(0, 0, 0);">**<span style="color: rgb(0, 0, 0);">Eteint</span>**</td><td style="border-color: rgb(0, 0, 0);"><span style="color: rgb(0, 0, 0);">entrées 1 et 2 ouvertes</span></td></tr><tr style="height: 29.7969px;"><td style="height: 29.7969px; border-color: rgb(0, 0, 0); background-color: rgb(224, 62, 45);"><span style="color: rgb(0, 0, 0);">rouge **fixe**</span></td><td style="height: 29.7969px; border-color: rgb(0, 0, 0);"><span style="color: rgb(0, 0, 0);">entrée 1 fermée / entrée 2 ouverte</span></td></tr><tr><td style="border-color: rgb(0, 0, 0); background-color: rgb(53, 152, 219);"><span style="color: rgb(0, 0, 0);">bleu **fixe**</span></td><td style="border-color: rgb(0, 0, 0);"><span style="color: rgb(0, 0, 0);">entrée 2 fermée / entrée 1 ouverte</span></td></tr><tr style="height: 29.7969px;"><td style="height: 29.7969px; border-color: rgb(0, 0, 0); background-color: rgb(185, 106, 217);"><span style="color: rgb(0, 0, 0);">violet **fixe**</span></td><td style="height: 29.7969px; border-color: rgb(0, 0, 0);"><span style="color: rgb(0, 0, 0);">entrée 1 et 2 fermées</span></td></tr></tbody></table>

### 2- Bloc de jonction à insertion

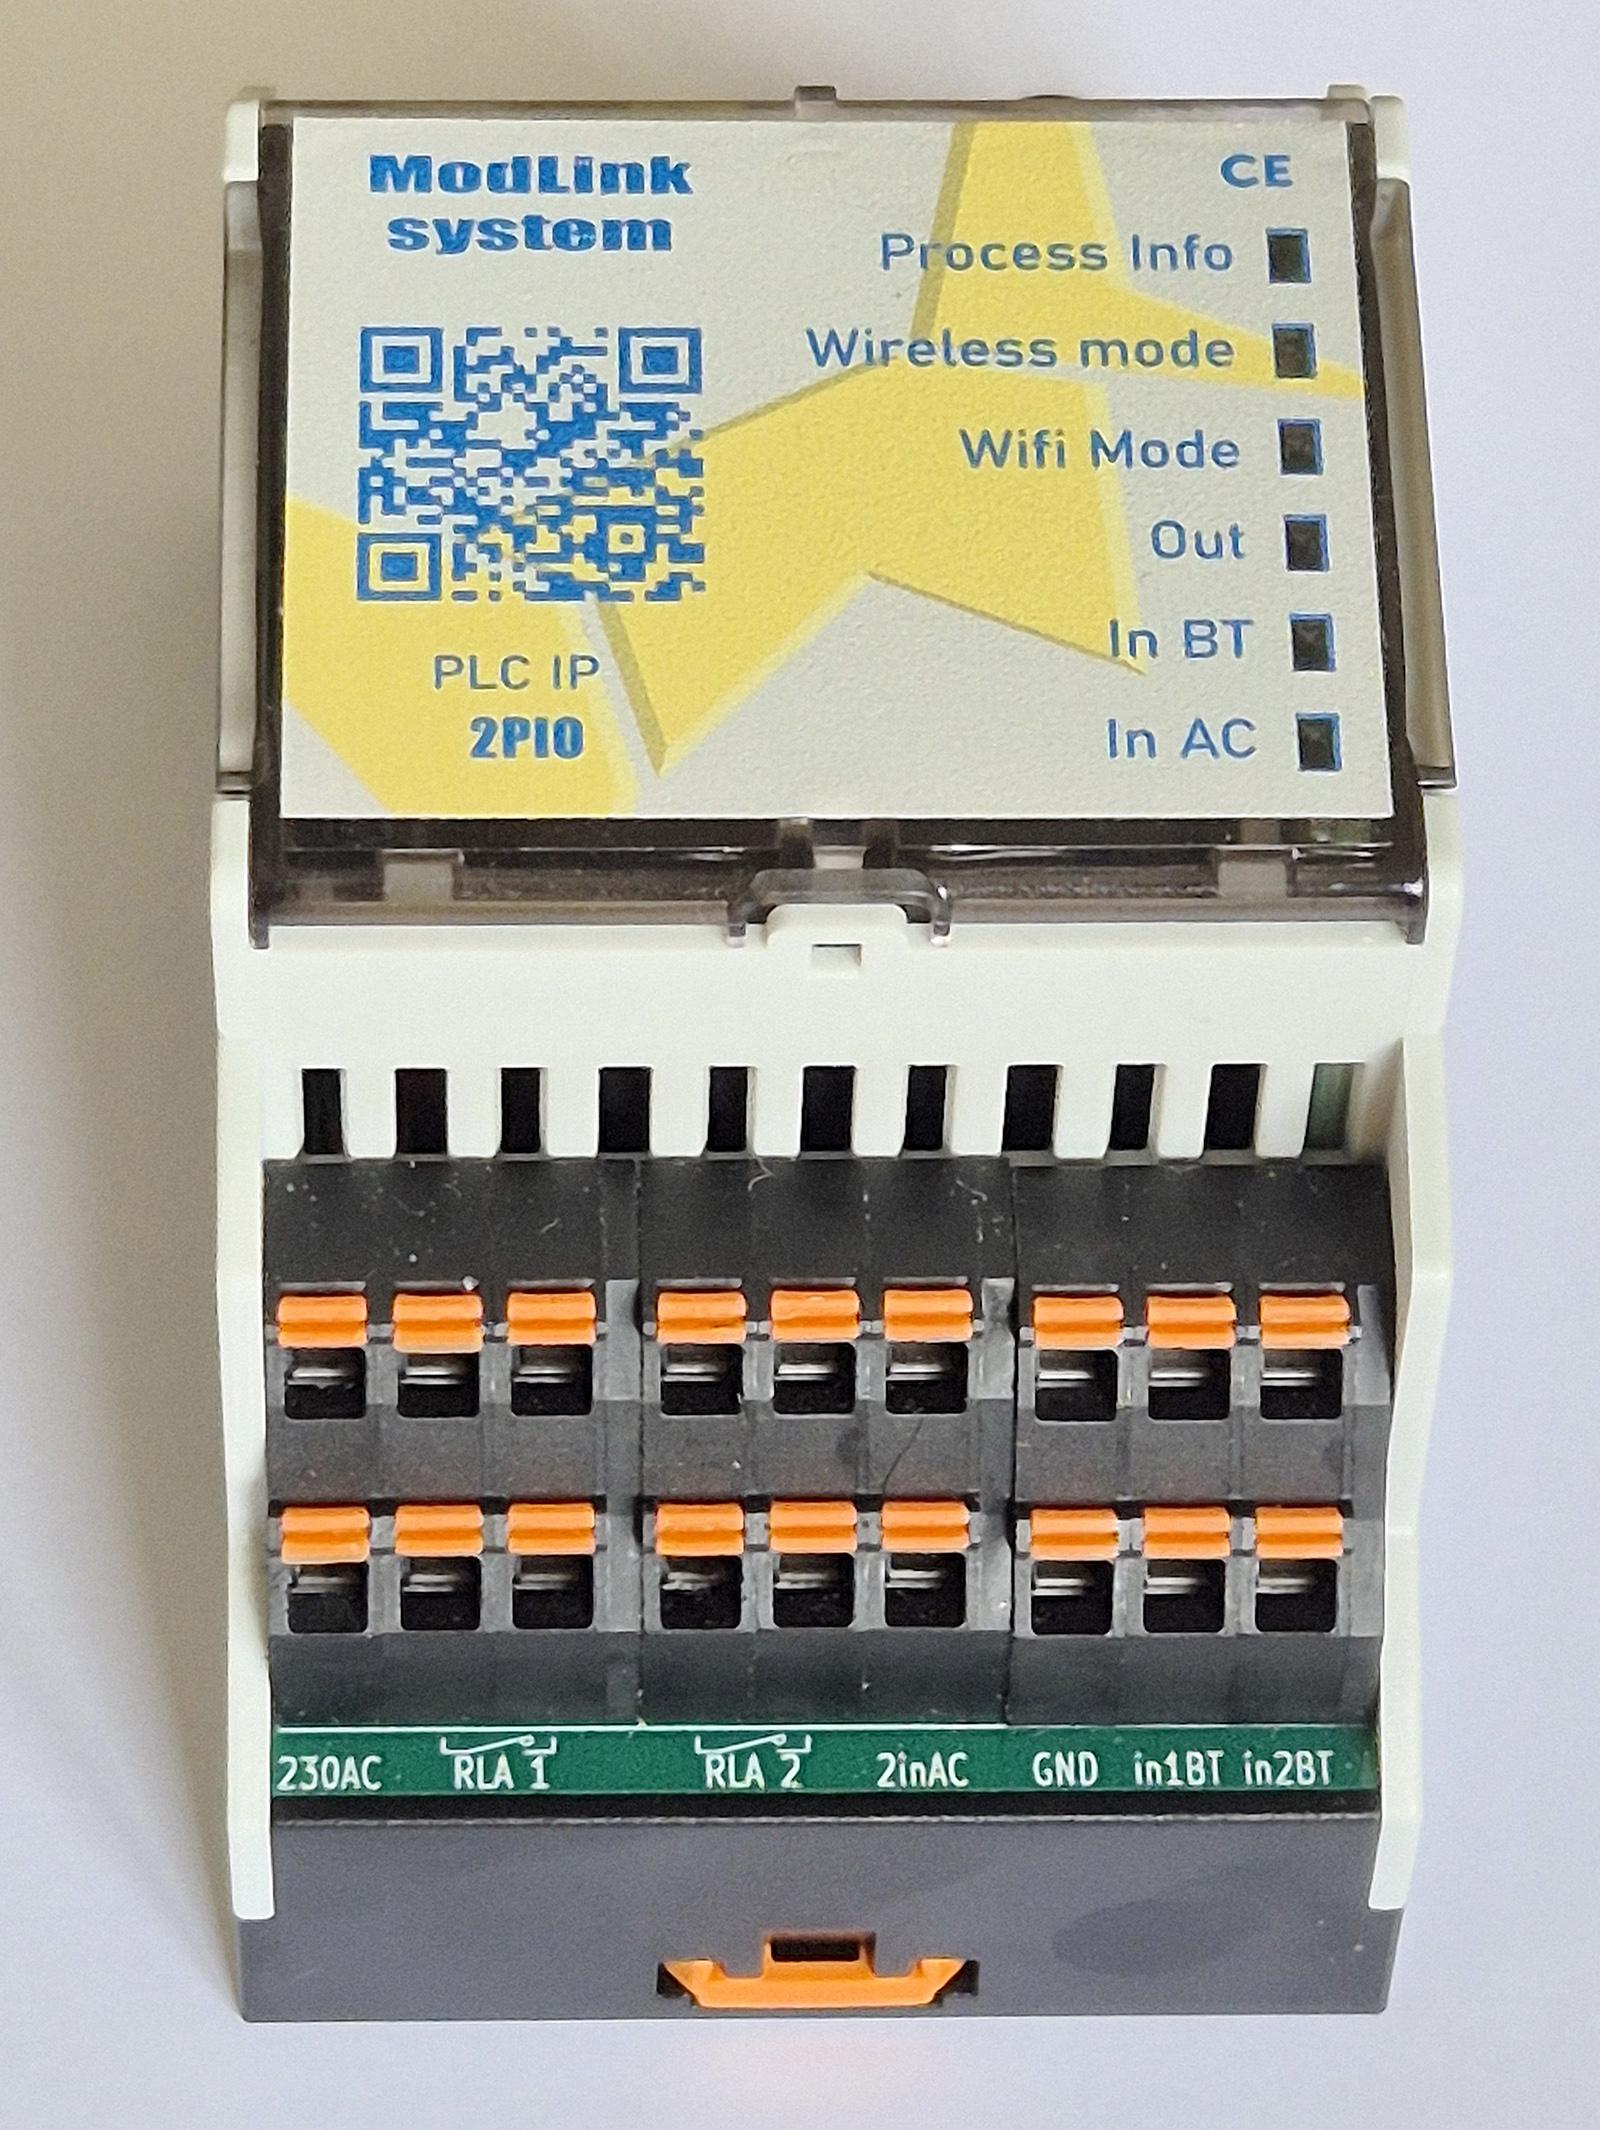
Le bloc de jonction à ressort est composé de 18 bornes réparties sur 2 rangées :

- Rangée du haut : bornes A1 à A9
- Rangée du bas : bornes B1 à B9

Il permet le raccordement rapide et sans vis (insertion directe) des alimentations, entrées, sorties relais et commandes.

[![Borniers.jpg](https://modlink.fr/help/uploads/images/gallery/2026-04/scaled-1680-/borniers.jpg)](https://modlink.fr/help/uploads/images/gallery/2026-04/borniers.jpg)
#### 2.1- Affectation des bornes

<table border="1" id="bkmrk-18%C2%A0-%C2%A0-230-ac-%C2%A0-rla-1" style="border-collapse: collapse; width: 100%; border-width: 1px; height: 283px;"><colgroup><col style="width: 8.5796%;"></col><col style="width: 10.367%;"></col><col style="width: 10.4862%;"></col><col style="width: 10.0095%;"></col><col style="width: 10.9633%;"></col><col style="width: 12.154%;"></col><col style="width: 9.53289%;"></col><col style="width: 14.1802%;"></col><col style="width: 13.4652%;"></col></colgroup><tbody><tr style="background-color: rgb(236, 240, 241);"><td class="align-center" colspan="9"><span style="color: rgb(0, 0, 0);">*rangée haute*</span></td></tr><tr style="height: 29.7017px; background-color: rgb(230, 126, 35);"><td style="height: 29.7017px; border-color: rgb(255, 255, 255); border-style: solid; background-color: rgb(174, 100, 35);">**<span style="color: rgb(255, 255, 255);">A1</span>**

**<span style="color: rgb(0, 0, 0);">Phase</span>**

</td><td style="height: 29.7017px; border-color: rgb(236, 240, 241); border-style: solid; background-color: rgb(186, 55, 42);">**<span style="color: rgb(255, 255, 255);">A2</span>**

**<span style="color: rgb(0, 0, 0);">Relais 1 COM</span>**

</td><td style="height: 29.7017px; border-color: rgb(236, 240, 241); border-style: solid; background-color: rgb(186, 55, 42);">**<span style="color: rgb(255, 255, 255);">A3</span>**

**<span style="color: rgb(0, 0, 0);">Relais 1  
NO</span>**

</td><td class="align-center" style="height: 29.7017px; background-color: rgb(224, 62, 45);">**<span style="color: rgb(255, 255, 255);">A4</span>**

**<span style="color: rgb(0, 0, 0);">Relais 2</span>**

**<span style="color: rgb(0, 0, 0);">COM</span>**

</td><td class="align-center" style="height: 29.7017px; background-color: rgb(224, 62, 45);">**<span style="color: rgb(255, 255, 255);">A5</span>**

**<span style="color: rgb(0, 0, 0);">Relais 2</span>**

**<span style="color: rgb(0, 0, 0);">NO</span>**

</td><td class="align-center" style="height: 29.7017px;">**<span style="color: rgb(255, 255, 255);">A6</span>**

**<span style="color: rgb(0, 0, 0);">Entrée 220V</span>**

**<span style="color: rgb(0, 0, 0);">1</span>**

</td><td style="height: 29.7017px; background-color: rgb(126, 140, 141);">**<span style="color: rgb(255, 255, 255);">A7</span>**

**<span style="color: rgb(0, 0, 0);">GND</span>**

</td><td class="align-center" style="height: 29.7017px; background-color: rgb(243, 162, 26);">**<span style="color: rgb(255, 255, 255);">A8</span>**

**<span style="color: rgb(0, 0, 0);">Alim 24V 1</span>**

</td><td class="align-center" style="height: 29.7017px; background-color: rgb(243, 162, 26);">**<span style="color: rgb(255, 255, 255);">A9</span>**

**<span style="color: rgb(0, 0, 0);">Alim 24V 2</span>**

</td></tr><tr style="background-color: rgb(236, 240, 241);"><td class="align-center" colspan="9" style="border-color: rgb(236, 240, 241); border-style: solid;"><span style="color: rgb(0, 0, 0);">*rangée basse*</span></td></tr><tr style="height: 29.7017px; background-color: rgb(230, 126, 35);"><td style="height: 29.7017px; border-color: rgb(255, 255, 255); border-style: solid; background-color: rgb(53, 152, 219);">**<span style="color: rgb(255, 255, 255);">B1</span>**

**<span style="color: rgb(0, 0, 0);">Neutre</span>**

</td><td class="align-center" style="height: 29.7017px; border-color: rgb(236, 240, 241); border-style: solid; background-color: rgb(186, 55, 42);">**<span style="color: rgb(255, 255, 255);">B2</span>**

**<span style="color: rgb(0, 0, 0);">Relais 1</span>**

**<span style="color: rgb(0, 0, 0);">COM</span>**

</td><td class="align-center" style="height: 29.7017px; border-color: rgb(236, 240, 241); border-style: solid; background-color: rgb(186, 55, 42);">**<span style="color: rgb(255, 255, 255);">B3</span>**

**<span style="color: rgb(0, 0, 0);">Relais 1</span>**

**<span style="color: rgb(0, 0, 0);">NO</span>**

</td><td class="align-center" style="height: 29.7017px; background-color: rgb(224, 62, 45);">**<span style="color: rgb(255, 255, 255);">B4</span>**

**<span style="color: rgb(0, 0, 0);">R</span><span style="color: rgb(0, 0, 0);">elais 2</span>**

**<span style="color: rgb(0, 0, 0);">COM</span>**

</td><td class="align-center" style="height: 29.7017px; background-color: rgb(224, 62, 45);">**<span style="color: rgb(255, 255, 255);">B5</span>**

**<span style="color: rgb(0, 0, 0);">Relais 2</span>**

**<span style="color: rgb(0, 0, 0);">NO</span>**

</td><td class="align-center" style="height: 29.7017px;">**<span style="color: rgb(255, 255, 255);">B6</span>**

**<span style="color: rgb(0, 0, 0);">Entrée 220V</span>**

**<span style="color: rgb(0, 0, 0);">2</span>**

</td><td style="height: 29.7017px; background-color: rgb(126, 140, 141);">**<span style="color: rgb(255, 255, 255);">B7</span>**

**<span style="color: rgb(0, 0, 0);">GND</span>**

</td><td class="align-center" style="height: 29.7017px; background-color: rgb(243, 162, 26);">**<span style="color: rgb(255, 255, 255);">B8</span>**

**<span style="color: rgb(0, 0, 0);">Entrée BT 1</span>**

</td><td class="align-center" style="height: 29.7017px; background-color: rgb(243, 162, 26);">**<span style="color: rgb(255, 255, 255);">B9</span>**

**<span style="color: rgb(0, 0, 0);">E</span><span style="color: rgb(0, 0, 0);">ntrée BT 2</span>**

</td></tr><tr style="background-color: rgb(22, 145, 121);"><td class="align-center" style="height: 29.7017px;"><span style="color: rgb(236, 240, 241);">**230 AC**</span>

</td><td class="align-center" style="height: 29.7017px;"><span style="color: rgb(236, 240, 241);">**RLA 1**</span>

</td><td class="align-center" style="height: 29.7017px;"><span style="color: rgb(236, 240, 241);">**RLA 1**</span>

</td><td class="align-center" style="height: 29.7017px;"><span style="color: rgb(236, 240, 241);">**RLA 2**</span>

</td><td class="align-center" style="height: 29.7017px;"><span style="color: rgb(236, 240, 241);">**RLA 2**</span>

</td><td class="align-center" style="height: 29.7017px;"><span style="color: rgb(236, 240, 241);">**2 in AC**</span>

</td><td class="align-center" style="height: 29.7017px;"><span style="color: rgb(236, 240, 241);">**GND**</span>

</td><td class="align-center" style="height: 29.7017px;"><span style="color: rgb(236, 240, 241);">**in 1 BT**</span>

</td><td class="align-center" style="height: 29.7017px;"><span style="color: rgb(236, 240, 241);">**in 2 BT**</span>

</td></tr></tbody></table>

- <span style="color: rgb(0, 0, 0);">Vérifier la **correspondance des tensions** avant raccordement (notamment l’entrée 230 V)</span>
- <span style="color: rgb(0, 0, 0);">Respecter les **sections de câbles** adaptées au courant utilisé</span>
- <span style="color: rgb(0, 0, 0);">S’assurer du bon enclenchement des conducteurs dans les bornes à ressort</span>
- <span style="color: rgb(0, 0, 0);">Couper l’alimentation avant toute intervention</span>

Voir [Raccordement électrique](https://modlink.fr/help/link/128#bkmrk-page-title)

### 3- Navigation avec le bouton de commande

<div id="bkmrk--4">  
</div>Chaque module est équipé d'un bouton de commande permettant d'exécuter certaines fonctions directement sur l'appareil, sans passer par l'interface Web.

<span style="background-color: rgb(251, 238, 184);">(photo du bouton)</span>

La navigation s'effectue à l'aide de différents types d'appuis sur le bouton :

- **Appui simple**
- **Double appui**
- **Appui long**

Le tableau ci-dessous récapitule les différentes actions disponibles

<table id="bkmrk-%C3%89tat-action-sur-le-b"><thead><tr><th><span style="color: rgb(52, 73, 94);">État</span></th><th>Action sur le bouton</th><th>Fonction</th><th>LED</th></tr></thead><tbody><tr><td>***hors menu***</td><td>Double appui</td><td>Accès au **menu 1**</td><td>bleu foncé</td></tr><tr><td>**menu 1**</td><td>Appui simple</td><td>Accès au **menu 2**</td><td>jaune</td></tr><tr><td> </td><td>Double appui</td><td>Lance le mode appairage</td><td>bleu clignotant</td></tr><tr><td> </td><td>Appui long</td><td>Transfert de la configuration Wi-Fi (SSID et mot de passe) ainsi que de la clé de cryptage</td><td>  
</td></tr><tr><td>**menu 2**</td><td>Appui simple</td><td>Accès au **menu 3**</td><td>violet</td></tr><tr><td> </td><td>Double appui</td><td>Quitte le mode **Slave/Wireless**</td><td>  
</td></tr><tr><td> </td><td>Appui long</td><td>Redémarre le module</td><td>  
</td></tr><tr><td>**menu 3**</td><td>Appui simple</td><td>Quitte le menu</td><td>bleu clair</td></tr><tr><td> </td><td>Double appui</td><td>Active ou désactive le mode **Wireless**,  
puis quitte le mode **Slave**</td><td>  
</td></tr><tr><td> </td><td>Appui long</td><td>Réinitialisation complète du module  
(configuration usine)</td><td>  
</td></tr></tbody></table>

# Entrées et sorties

### 1- Entrées

- **2 entrées basse tension configurables** :  
    \- ToR  
    \- 4 / 20 mA
- **2 entrées haute tension 220V**

<p class="callout info">Les entrées sont accessibles dans le système sous forme de **variables lisibles** Leur exploitation dépend des **droits** et de l'**exposition**</p>

<p class="callout warning">Les entrées basse tension 4-20 mA peuvent être **configurées en mode analogique** afin d'exploiter une même entrée physique comme deux entrées distinctes (A et B). Cette fonctionnalité permet d'augmenter le nombre d'entrées disponibles sur le module.  
*L'utilisation de ce mode nécessite un **câblage spécifique** au niveau des capteurs [Câblage d'une entrée analogique en mode 2 canaux](https://modlink.fr/help/link/128#bkmrk-entr%C3%A9es-bt-%C3%A0-boucle-)*</p>

### 2- Sorties

<span style="font-size: 10.0pt; mso-bidi-font-size: 12.0pt; font-family: Symbol; mso-fareast-font-family: Symbol; mso-bidi-font-family: Symbol;"><span style="mso-list: Ignore;">·<span style="font: 7.0pt 'Times New Roman';"> </span></span></span>**<span style="mso-fareast-font-family: 'Times New Roman'; mso-fareast-theme-font: major-fareast;">2 sorties de puissance</span>** :  
\- courant maximal <span style="mso-fareast-font-family: 'Times New Roman'; mso-fareast-theme-font: major-fareast;">50 A  
</span>- contacts <span style="mso-fareast-font-family: 'Times New Roman'; mso-fareast-theme-font: major-fareast;">libres de potentiel  
<span style="mso-fareast-font-family: 'Times New Roman'; mso-fareast-theme-font: major-fareast;">- m</span>esure de courant intégrée  
</span><span style="mso-fareast-font-family: 'Times New Roman'; mso-fareast-theme-font: major-fareast;">- commutation au zéro crossing</span> (réduction des contraintes électriques et des perturbations)

<p class="callout info">Les sorties sont commandées par **écriture de variables** La communication est réalisée au **zéro crossing** La **mesure de courant** peut être exploitée dans les scénarios</p>

# Caractéristiques techniques

- **2 entrées 24 V configurables** (analogique / numérique)  
    \- ToR  
    \- 4/20 mA
- **2 entrées universelles numériques 220V**
- **2 sorties ToR 32A**  
    \- contacts libres de potentiel  
    \- mesure de courant intégrée  
    \- commutation au zéro crossing (moins d'arcs, moins de parasites)
- Logique autonome stockée sur l'objet, scénarios en boucle continue
- Pilotage et visualisation via navigateur Web (pas d'application mobile)
- 2 entrées 12/48 V configurables (ToR ou 4-20mA)
- Horloge en temps réel (RTC)
- Planification
- Journalisation
- Notifications par email et SMS
- Redémarrage automatique
- Montage : rail DIN / mural
- Protocoles : HTTP, XML, Modbus TCP/IP, SNMP, SMTP, Services distants
- Communication en peer-to-peer pour un partage des données en temps réél
- Caractéristiques physiques  
    \- température de fonctionnement : -40°C à 65.5°C  
    \- dimensions : ??mm de large,?? mm de hauteur, ?? mm de profondeur- Poids : ??grammes  
    \- matière du boîtier : plastique polycarbonate  
    \- résistance du boîtier à la flamme : UL94 V0
- Alimentation  
    \- voltage :  
    \- courant :
- Relais 1  
    \- voltage max :  
    \- courant max :  
    \- type de contact :  
    \- type de charge :  
    \- résistance du contact :  
    \- fonctionnement : ON / OFF ou impulsionnel  
    \- durée du temporisation d'impulsion :
- Entrée 1  
    \- type : isolation optique  
    \- plage de tension :  
    \- voltage :
- Connectivité   
    \- Communication TCP / IP (Ethernet / WiFi)  
     *installation sans câblage complexe  
    -* Adressage simplifié (DHCP / mDNS)  
     *pour une intégration réseau fluide  
    -* Serveur OPC UA  
     compatibilité immédiate avec les serveurs GTB / GTC et SCADA  
    \- Communication inter-modules sur le même réseau (découverte auto mDNS)  
     v*ariables partagées entre modules sans serveur central  
    -* Accès distant via tunnel SSH sortant (pas de cloud public)  
     *accès sécurisé sans redirection de ports  
    -* Connexions chiffrées  
     *TLS et protections anti-rejeu actives*
- Pas de câblage complexe

# Garantie

Le matériel est garanti 2 ans (pièces et main d'oeuvre)